
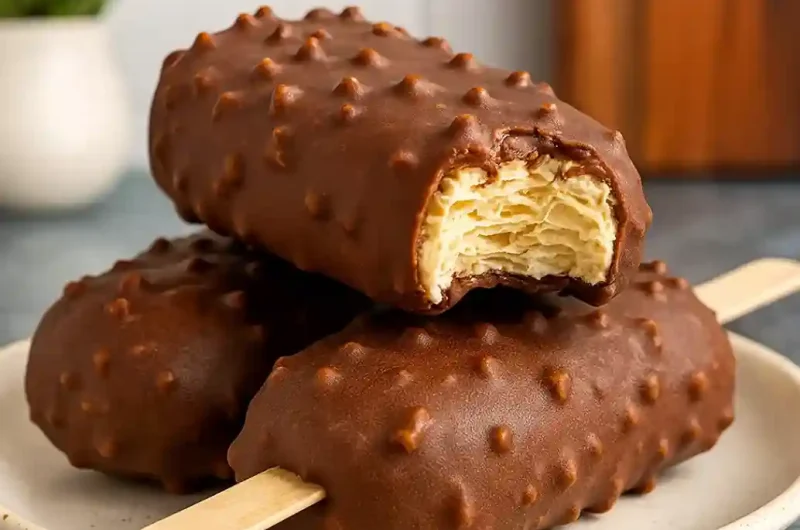
I love making these chocolate-covered ice cream bars at home. They remind me of summer and taste much better than the ones from the store. I can use real vanilla, good chocolate, and make them just the way I like.
These bars are also easy to prepare. I mix a creamy ice cream base, pour it into molds, and freeze it. After that, I dip the frozen bars into melted chocolate. The chocolate hardens fast and gives a nice crunch.
This homemade eskimo pie popsicle recipe is simple, fun, and easy to change depending on what you like. You can make them less sweet, add nuts, or even use different flavors.
Key Takeaways
- What it is: A homemade Eskimo Pie popsicle is a vanilla ice cream bar covered in a hard chocolate shell. It tastes creamy, sweet, and cold. You can make it at home using simple ingredients.
- Ice cream base: The base uses whole milk and heavy cream to make it smooth. Sugar adds sweetness, and vanilla gives a soft and tasty flavor.
- Chocolate coating: In this homemade eskimo pie popsicle recipe, we melt chocolate and mix it with refined coconut oil. This makes the chocolate set quickly when it touches the cold ice cream.
- Freeze before dipping: Let the pops freeze completely before dipping them in chocolate. After dipping, wrap each one in parchment paper so they do not stick together.
- Best time to eat: Keep the pops in the freezer and enjoy them within a month. They taste the best when they are fresh.
What Is a Homemade Eskimo Pie Popsicle?
A homemade Eskimo Pie popsicle is a bar of vanilla ice cream covered in a hard chocolate shell. People first started making this kind of treat in the early 1920s. It was one of the first frozen desserts sold on a stick.
This popsicle has creamy vanilla ice cream on the inside and crisp chocolate on the outside. When you make it at home, you can change this homemade eskimo pie recipe to match your taste. You can choose what kind of milk or cream you use. You can make it more or less sweet. You can use dark chocolate, milk chocolate, or white chocolate. You can even add other flavors like mint or coffee.
Why I Love This Frozen Chocolate-Covered Treat
Nostalgic, Creamy, and Coated in Chocolate
This treat feels special every time I eat it. The chocolate shell breaks with a nice crunch, and inside you get soft and cold vanilla ice cream. The smell of real vanilla is sweet and calming. When I use good chocolate, the little bit of bitterness balances the sweet flavor. Making these at home brings back childhood memories, but they taste even better because the ingredients are fresh and real.
Easy to Make and Fun to Customize
This homemade eskimo pie recipe needs only a few basic items from the kitchen and it is very easy to customize. You do not need an ice cream machine. Once you make the base, you can mix in cookie bits or jam. You can also add chopped nuts or colorful sprinkles on the melted chocolate. I like using dark chocolate with a little sea salt.
Best Homemade Eskimo Pie Popsicle Recipe
Course: DessertCuisine: AmericanDifficulty: Easy8
servings15
minutes200
kcalMake the best homemade Eskimo Pie popsicles with creamy vanilla ice cream and a crisp chocolate shell. Easy, fun, and freezer-friendly.
Ingredients for Eskimo Pie Popsicles
Creamy Vanilla Ice Cream Base
1½ cups whole milk
1½ cups heavy cream
⅔ cup sugar
1 pinch of salt
Seeds from 1 vanilla bean or 2 teaspoons vanilla extract
Rich Chocolate Coating
8 ounces dark or semi-sweet chocolate (chopped)
6 ounces refined coconut oil
1 tablespoon corn syrup (optional)
Optional Add-ins or Toppings
Crushed cookies
Brownie bits
Fruit preserves
Chopped nuts
Toasted coconut
Sprinkles
Pinch of sea salt
How to Make Homemade Eskimo Pie Popsicles
- Make the Ice Cream Mixture: Pour the milk, cream, sugar, salt, and vanilla into a saucepan. Warm it on the stove and stir until the sugar melts. Take it off the heat and let it cool. Put the mixture in the fridge to chill. This helps the pops freeze better and gives time for the vanilla to add flavor.
- Pour into Popsicle Molds and Freeze: Take the cold mixture and pour it into popsicle molds. Leave a little space at the top. Put the sticks in and freeze for at least 4 hours. If you freeze them overnight, they will turn out firmer.
- Prepare the Chocolate Shell: In a bowl, mix the chopped chocolate and coconut oil. Melt them in the microwave or use a double boiler. Stir until smooth. Let the chocolate cool down a bit. It should still be warm, but not too hot. If it is too hot, it can melt the ice cream.
- Dip Frozen Popsicles and Let Set: Take the popsicles out of the molds by running warm water over the outside for a few seconds. Dip each frozen pop into the melted chocolate. Let any extra drip off. If you want, add toppings like sprinkles or nuts. Place the dipped pops on parchment paper and freeze again for a few minutes. When the chocolate looks matte instead of shiny, it is ready.

Nutrition Facts
8 servings per container
- Amount Per ServingCalories200
- % Daily Value *
- Total Fat 23g 30%
- Saturated Fat 17g 85%
- Trans Fat 0g
- Cholesterol 35mg 12%
- Sodium 40mg 2%
- Total Carbohydrate 27g 10%
- Dietary Fiber 2g 8%
- Total Sugars 24g
- Protein 3g 6%
- Potassium 200mg 5%
* The % Daily Value tells you how much a nutrient in a serving of food contributes to a daily diet. 2,000 calories a day is used for general nutrition advice.
More Recipes You’ll Love
Also check out the delicious recipe of Delicious Sausage Muffins.
Tips for Success
How to Remove Popsicles Easily from the Mold
Silicone molds are the easiest because the pops come out smoothly. If you are using a hard plastic mold, dip it in warm water for a few seconds. Then gently pull the stick straight up. Do not twist it. If the popsicle still does not come out, put it back in the freezer for a little longer.
How to Get a Smooth, Crack-Free Chocolate Coating
Make sure the popsicles are frozen solid and do not have any frost on them. If you see frost, gently wipe it off before dipping. Dip the pop in the melted chocolate just one time. Let the coating turn from shiny to matte before touching or moving it. This helps prevent cracks and keeps the shell nice and smooth.
Serving Ideas
Best Times to Enjoy Them
These popsicles are perfect on hot days, at picnics, or after dinner. They are easy to hold, already in single portions, and great for parties or family gatherings.
Fun Variations for Kids and Adults
Kids enjoy them with milk chocolate and colorful sprinkles or cookie bits. Adults can dip them in dark chocolate and add a little sea salt or a bit of espresso powder for a richer flavor. Around the holidays, use peppermint extract and crushed candy canes for a festive twist.
Storage Tips
How to Keep Them Fresh and Prevent Freezer Burn
Wrap each popsicle in parchment or wax paper after the chocolate shell sets. Then place them in an airtight container or a sealed freezer bag. Keep the container near the back of the freezer where the temperature stays steady. This helps the pops stay fresh and keeps them from getting freezer burn. They taste best when eaten within one month.
Health and Nutrition Highlights
Calories and Ingredients You Can Control at Home
Each homemade Eskimo Pie popsicle has about 200 calories, depending on the size of the mold and the type of chocolate you use. The base of cream, milk, and sugar provides a creamy texture along with calcium and vitamin A.
You can also customize it according to your preferences. This makes it the best homemade eskimo pie popsicle recipe. Try using less sugar or replace some with honey or maple syrup. Use Greek yogurt or light coconut milk instead of all the cream to make the pops lighter.
FAQs
Can I make Eskimo pies without an ice cream maker?
Yes, you can. This homemade eskimo pie recipe does not need an ice cream machine. Just mix the ingredients, pour them into molds, and freeze them. The texture still turns out smooth and creamy.
What kind of chocolate works best for the coating?
Use dark or semi-sweet chocolate. These types melt well and harden nicely. Make sure to mix the chocolate with refined coconut oil so it sets quickly on the frozen ice cream.
How do I keep the chocolate from cracking or falling off?
Make sure the popsicles are completely frozen and dry before dipping. Wipe off any frost. Dip each one quickly and let the coating set without moving it. This helps the shell stick and stay smooth.
Can I use dairy-free ingredients for a vegan version?
Yes, you can. Use plant-based milk like almond or oat milk and coconut cream instead of dairy. Also use dairy-free chocolate. The taste stays rich and creamy.
Do I need to temper the chocolate?
No, you do not need to temper it. The coconut oil helps the chocolate harden without tempering. Just let the melted chocolate cool a little before dipping so it does not melt the ice cream.
How long do homemade Eskimo pies last in the freezer?
They stay fresh for about one month. Wrap each one in parchment or wax paper, then keep them in a sealed container or freezer bag.
Yes, you can. After dipping the pops in chocolate, sprinkle nuts, cookies, or any topping you like right away while the chocolate is still wet. Then freeze them again to set.

I’m a sweet chef who loves creating irresistible cakes, pastries, and sweet treats. When I’m not baking, you’ll find me experimenting with new flavors, enjoying a good cup of coffee, and sharing my passion for desserts with the world.